Butternut Squash Soup

With fresh Ginger, Rosemary, and Thyme this soup will be your new fall staple!
**Gluten Free, Dairy Free, Meat Free, Nut Free, does contain seeds**

Butternut squash soup is one of my favorite fall meals, it’s so simple and can be frozen for future meals. The creaminess of the soup comes from pureeing the squash down so there are relatively few ingredients in this making the meal very low effort! You can customize your own version of the soup by changing the type of cream added or using different toppings, but these are my personal favorites right now. Let’s walk through the simple steps!

Start with raw squash. You’ll cute it in half and then scoop out the seeds from the small pocket so that you’re left with a clean shell, skin on. I find that you get the best flavor on this soup by roasting these halves whole and then adding just the roasted flesh to your soup pot.

While your roasted squash are cooling, assemble your other ingredients to get the stock going! Because you’ll be blending everything together you can save yourself a lot of time by rough chopping all of your aromatics. For this recipe I added ginger root, Vidalia onion, and garlic cloves to my soup pot and sautéed them until they were aromatic. At this point I added my fresh chopped rosemary and thyme.

As this cooks hopefully your squash has cooled enough to be handled. You can either peel of the skin for the squash or use a spoon to scoop out the flesh. Make sure to inspect your pieces, you don’t want any skin still attached to it when it goes in the pot! Once all the squash is in you can add your broth and use your immersion blender to get everything all smooth! Alternatively if you don’t have an immersion blender you can take the squash pieces and dump your sauteed aromatics into a traditional blender with your broth and blend until smooth. At this point I stir in my cream of choice (coconut milk) and get ready to enjoy!

Top with a crunchy topping of your choice, my personal favorite this year is the pumpkin spice pepitas from Trader Joes! Enjoy!

  • Ingredients
    • 2 medium butternut squash
    • 1 large (or 2 medium Vadalia onions)
    • Ginger Root, peeled ~50 grams
    • 3 large garlic cloves
    • Fresh rosemary
    • Fresh Thyme
    • 4 cups of Vegetable broth (if using low sodium add 1 Tbsp of salt or salt to taste)
    • 1 can of coconut milk
    • Crunchy topping of choice!
  • Instructions
    • Take both butternut squash and cut in half the long way (“hot dog” style). Coat lightly with olive oil and place skin side down on a baking tray and place into a pre-heated oven at 430 degrees Fahrenheit and cook for 35 minutes or until tender all the way through.
    • Remove squash from the oven and place on a cooling rack until cool enough to handle with your hands.
    • While the squash is cooling, rough chop your peeled ginger root, Vidalia onion, and garlic cloves.
    • In a stoup pot, heat oil over medium heat and add the chopped ingredients to the pot. Cook until onions are translucent and garlic/ginger are aromatic.
    • Add 1 Tbsp of fresh thyme and 1 tsp of finely chopped fresh rosemary and stir to coat the vegetables.
    • Remove squash skin carefully and add the flesh only to the soup pot followed by the 4 cups of vegetable broth.
    • Use an immersion blender (or the traditional blender alternative described above) to blend until smooth and no chunks are left.
    • Open the can of coconut milk and stir in until well incorporated into the soup.
    • Continue to simmer for 1 hour or enjoy immediately! This recipe makes several servings so if you want to keep leftovers you can package the remaining portions and pop them into the freezer for later!

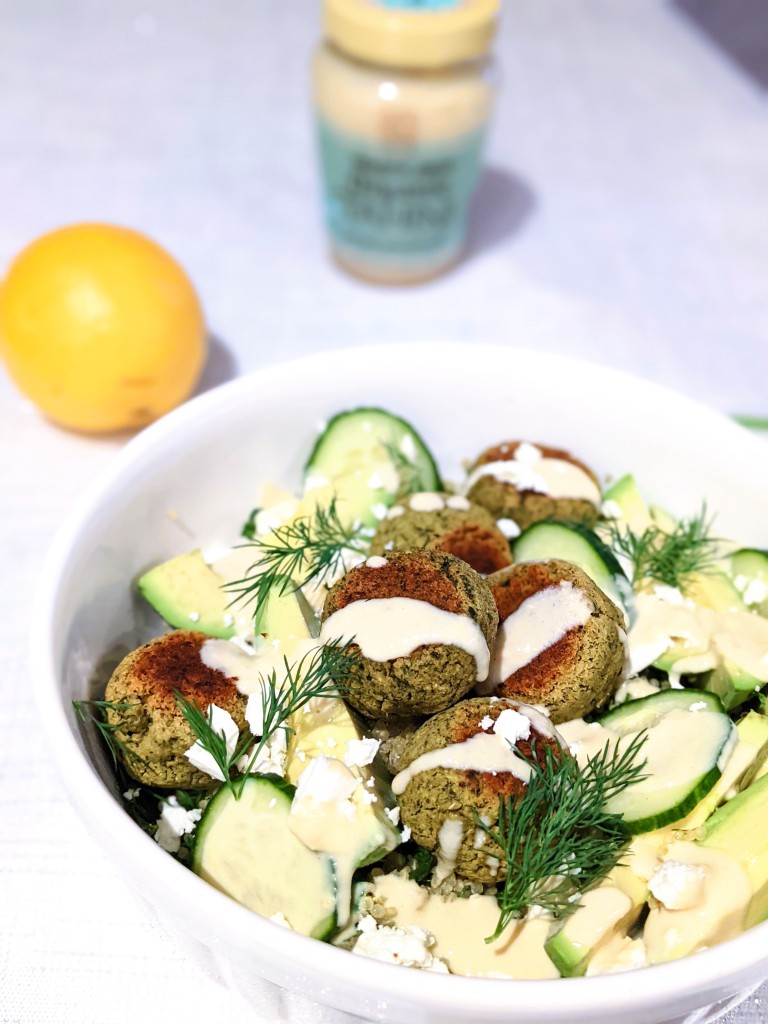
Falafel Bowl

Hello all! Wow I looked and my last post was all the way back in September! The craziness that was 2020 definitely caught up with me, while I tried to stay present on Instagram I definitely let the blog fall to the side as I began my new career in the midst of this crazy pandemic! While I don’t usually subscribe to the whole “new year, new me” mentality, I do want to bring a renewed sense of purpose to this page in 2021!

Up first: Falafel bowls! I love the fresh herb dill and this bowl is a great way to showcase it. It’s probably one of the more under utilized herbs in American cooking but it brings a sharp fresh note to this dish that I am in love with

What is falafel? A common Middle Eastern food, falafel is made of ground chickpeas, spices, and fresh herbs. It’s commonly served in a pita, but a lot of places here in the States have adapted it to almost any meal. You can find it served along with hummus, fresh pita, a salad or like you’ll see here, in a grain bowl! I like this method because I can meal prep a bunch of servings to bring to work for lunch and know I’m having a healthy hearty lunch. Falafel is a great source of plant protein and a good way to stay full throughout the day!

Falafel ingredients

There’s two main ways to approach falafel- the traditional fried method or the healthier baked option. Falafel is usually deep fried, but can also be cooked pan fried if you don’t want to use or don’t have a lot of frying oil. Frying the falafel gives it a thick crispy crust to contain a softer herbed inside. Baked means you’ll definitely use less oil and the falafel itself absorbs less oil as well. You don’t tend to get that same crust on the outside, but you can bake a bunch at once which is why I usually opt for it (meal prepping problems).

You can see here the baked version still has that green color as the outside hasn’t cooked as deeply as it would with a deep fry. The image below shows one deep fried falafel in a sea of baked ones, you can really tell the difference.

The rest of this grain bowl includes quinoa, kale, cucumber, feta, and avocado. It’s all topped with a tahini lemon dressing! Check out the recipe below!

Ingredients

  • For Falafel
    • 2 cups cooked chick peas (freshly cooked are more flavorful but you can use cans as well)
    • 1 bunch fresh parsley
    • 1 bunch fresh cilantro
    • 2 large cloves fresh garlic cloves
    • 1 small shallot
    • 1 Tbsp ground cumin
    • 1 tsp salt
    • 1 tsp pepper
    • 1-2 Tbsp flour, more as needed
  • For Grain Bowl
    • 1 cup Quinoa
    • 1 bag (10-14oz) of Kale
    • Some European cucumber, sliced
    • 1/4 cup feta cheese
    • 1 bunch fresh dill
    • 1 ripe avocado
  • For the Tahini Lemon Dressing
    • 1/2 cup Tahini
    • 1/2 cup lemon juice
    • 1/4 cup olive oil

Instructions

  • Add the cooked chick peas, 1/2 bunch cilantro, 1/2 bunch parsley, the shallot, garlic, cumin, salt and pepper to a food processor. Pulse ingredients until they are roughly combined. Add 1 Tbsp of flour and continue to pulse. Continue to add flour up until it loosely resembles dough. This is usually around 2 Tbsp for me.
  • Form the falafel dough into small balls roughly 1-1.5 inches in diameter. Cook by either dropping into a deep fryer, pan frying until all sides are golden brown, or place on a baking sheet and bake at 400 for 20-25 minutes, until the edges have a firm dry texture.
  • While falafel is cooking, boil quinoa according to package instructions, pulse the kale in the food processor until is is finely diced and will mill well in with the quinoa. Combine both together in mixing bowl. Add the dill trimmings and mix well.
  • In a ball jar container, add the ingredients for the dressing. Secure the cap tightly and shake vigorously until the mixture is an emulsion (well combined without separated layers).
  • Once falafel is cooked, assemble your bowl, scoop the desired quinoa into a bowl, top with sliced avocado, cucumber, crumbled feta, and the cooked falafel. Drizzle dressing over the top and garnish with more fresh dill.
  • Eat and enjoy!!

Prickly Pear Margaritas

Hi again friends! In quarantine I have started a new job and transitioned my role within the health center so it’s been a busy time for me. Getting recipes together hasn’t been at the top of my to do list but today I’m happy that bring you another cocktail to celebrate this long weekend!

This cocktail is inspired by one of my favorites from a local bar here in Boston that I haven’t been able to go to in months. Prickly pears can be hard to come by in the northeast but occasionally they have them at the outdoor market I shop at. When I saw them this week I knew I had to jump on them! This cocktail only has four ingredients and makes a delicious drink! Up first is getting the juice from the prickly pear.

Start by inspecting the outside of the pear, the small spines on the surface should be removed and the skin should be smooth. If you happen to purchase them from a store that hasn’t done this, use thick gloves and the sharp end of a knife to remove them. To remove the flesh, cut the fruit in half and hold it over a bowl squeeze the other end and the flesh will pop right out! Use a spoon or your fingers to remove any remaining fruit.

Transfer the fruit into a fine mesh sieve and use a wooden spoon or a spatula to press the fruit and juice through the mesh, the seeds will remain on top. A good amount of the fruit will remain just on the other side of the mesh, so scrape the underside frequently. Go ahead and taste the juice! It has a very subtle sweetness to it and a unique flavor. If you prefer a sweeter margarita you can stir in a little sugar at this point, otherwise continue on.

Measure how much juice you got, from two pears I got about a half cup, so that’s what I use in the measurements below. If you get more or less, just adjust the recipe by keeping the ratio the same. It will be one part prickly pear juice to two parts triple sec, fresh lime juice, and 1.25 parts tequila. If you want tips on how to easily juice limes without a citrus juicer check out my post on the Classic Margarita!

Mix all your components together then pour over ice into a glass rimmed with salt (I like to mix chili lime seasoning in with my salt) and enjoy!

Ingredients: Makes 4 Margaritas

  • 2 prickly pears- juiced
  • 1 cup triple sec
  • 1 cup freshly squeezed lime juice
  • 1 1/4 cup tequila

Instructions:

  • Mix all ingredients together and pour over ice into a glass rimmed with salt. Sip and enjoy!

Vegetable Curry

Allergens: dairy free, gluten free, vegan

Tonight was clean out the fridge night which usually means one of three things: chili, soup, or curry! Considering how many veggies I still had I opted for curry since it’s feeling hot for soup. Curry is so flavorful and healthy, it’s really a win win meal. I used veggies I had on hand, but you can certainly modify this recipe for whatever you have in the fridge!

This recipe makes a BIG batch, so if you’re feeding a family of four or more this is for you. If you a one or two mouth household, this will hold great in the fridge for a few days of you can freeze leftovers.

This curry pairs well with any grain you have on hand, rice, quinoa, even farro or cous cous if you’re feeling it!

Once all your veggies are prepared and the ginger root is diced, you’ll heat a heavy bottomed pot (I always use my dutch oven) over medium heat. Add olive oil and the ginger root and cook until the aromatic scent of the ginger is filling your kitchen. Then add your veggies, the cans of tomato and the spice mix.

Give the veggies a few minutes to stew in the tomato juice and the infuse the spices, then add the cans of coconut milk and the vegetable stock. Simmer for an 30-45 minutes. You can certainly cook it longer, the flavor definitely gets better but you may find some of your vegetables break down more than you like, use your best judgement!

Serve with your favorite grain and enjoy!

Ingredients:

  • One large head of cauliflower
  • Two medium heads of broccoli
  • Two bell peppers
  • 5 large carrots
  • 1.5in fresh ginger root finely diced
  • 2 cans 14oz diced tomatoes
  • 2 cans 14oz coconut milk
  • 2 cups vegetable stock
  • 3tbsp curry powder
  • 3tbsp tumeric
  • 1.5tbsp garam masala
  • 1.5tbsp cumin
  • 1tbsp paprika

Instructions:

  • Cut the cauliflower and broccoli into small-medium florets, slice the carrots into rounds ~1/4cm in thickness. Slice the bell peppers into 2in slices.
  • Heat a heavy bottomed pan over medium heat. Add olive oil and cook the finely diced ginger for 1-3 minutes, until aromatic. Add the vegetables and the tomatoes (including the juice) and the spice mix. Cook for another 1-3 minutes.
  • Add the coconut milk and vegetable stock, stir to combine. Heat to a vigorous simmer and cook for 30-45 minutes. The liquid should be reduced to at least 2/3 the volume it started with. Cook as long as you can without your vegetables breaking down too much.
  • Serve your finished curry over your choice of cooked grain and enjoy!

Beet Green Berry Smoothie

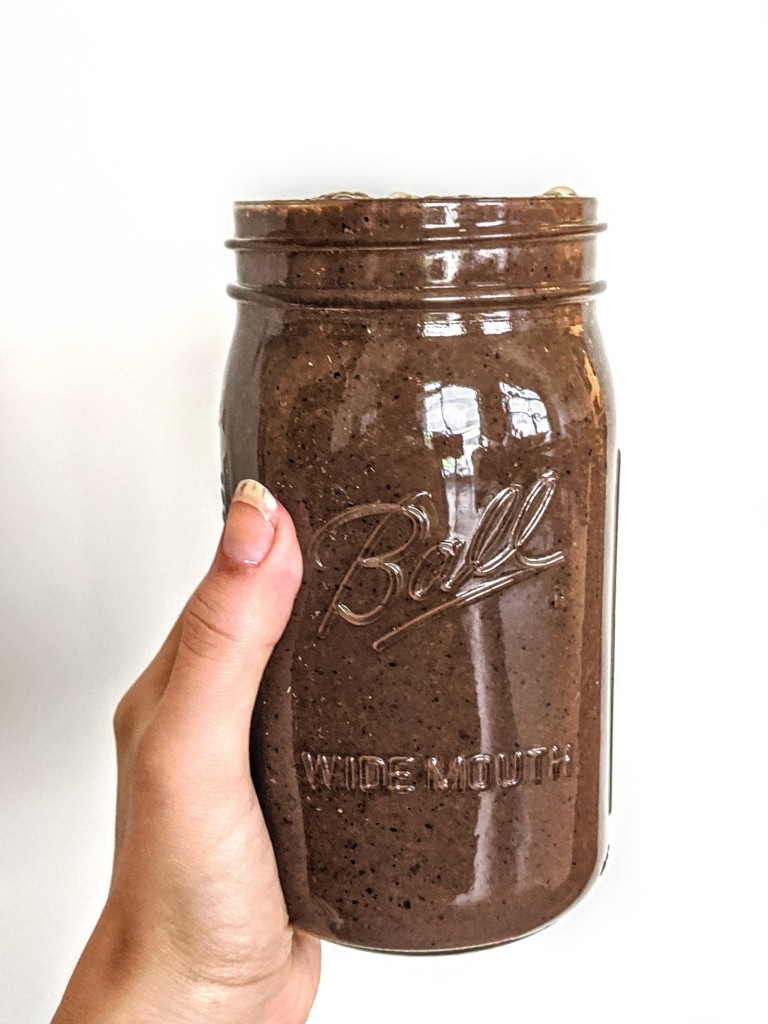
I’ve been in a big take out mood lately after returning to full time work. While take out is delicious and definitely makes my life easier, I have since found myself craving a fresh healthy smoothie to balance it out. At the market this week were some delicious bunched beets for just $1.00 a bunch! I can’t say no to a deal like that, and so I knew my smoothies this week would need to incorporate beet greens somehow. While this smoothie looks like it would have a chocolate taste (or as my partner so lovingly pointed out, “looks like poo”) it’s just the combination of the red, blue, and green foods in this smoothie. I know it may not look appetizing, but it tastes delicious!

Beet greens are super nutritious, being a great source of vitamins K, A, and C as well as iron. By blending them instead of juicing them, you also preserve more of the natural fiber content. Blueberries and cherries are great sources of antioxidants as well as other vitamins and minerals. The sweet fruits help balance the more bitter taste of the beet greens. I also add nonfat plain greek yogurt because it’s a great source of calcium and protein without me having to trust the quality of a protein supplement (supplements are not subject to FDA regulations and so I do my nest to avoid them just to be on the safe side).

After pitting your cherries, you simply add the ingredients to a high powered blender and blend! The natural sugars paired with fiber and protein will leave you feeling full all morning into the afternoon.

Ingredients:

  • 2.5 cups chopped beet greens plus stems
  • 1 cup pitted cherries
  • 1 cup blueberries
  • 2 cups raw baby spinach
  • 1 cup plain nonfat greek yogurt
  • 1/3 cup milk of choice (I use oat milk)

Instructions:

  • Properly wash all produce.
  • Remove the pit from all cherries.
  • Add ingredients to a high powered blender capable of breaking down beet greens, blend on high for 30-50 seconds or until smooth.
  • Pour into a glass an enjoy!

Coconut Flour Molten Lava Cake

Allergen information: Gluten free, Dairy free, Nut free, Contains Eggs

I am so excited to finally be bringing this recipe to everyone! I have many people in my life who have food allergies or intolerances. There seems to be a molten lava cake recipe out there for everyone, though usually in replacing one allergen, another pops up. Swapping all purpose flour or almond flour solves one problem, but may create another for those with multiple allergies. I worked to make this recipe as allergen friendly as possible, though it does still contain eggs. I might try working on one with an aquafaba substitute but I’m still thinking on what could be used to substitute for the egg yolks, feel free to leave any suggestions in the comments!

This cake is also super exciting because I often find that “gluten free” baking, while delicious, does have a definite taste difference. This recipe I find difficult to taste a difference between it and a gluten containing recipe.

You may notice that I labeled this recipe as dairy free, but that I picture and list butter as an ingredient. I currently didn’t have dairy free butter or coconut oil in my quarantine pantry, but I’ve had excellent results in past baking using them in a 1:1 substitution, so I have no doubt they will work just as well in this recipe as well. If butter doesn’t bother your lactose intolerance feel free to keep it as is, if it does, make the swap!

I love using this fair trade sugar from Trader Joes because I know it is ethically sourced. Food sourcing when we live in the age of industrial food processing and consumption can be a tricky task. I had the opportunity to observe first hand the living conditions of those who produce a large majority of the sugar cane for the US and ever since have been making a big push to reduce my consumption and use fair trade when possible. You’ll notice a lot of my recipes use natural sweeteners as a result, but for baking it’s just difficult to avoid using, especially in a recipe like this where the chemistry is so important!

A few key things you’ll notice when baking with coconut flour:
* It is far more absorbent than all purpose four, a little goes a LONG ways.
* It makes baked goods very dense

One key I’ve discovered is to combine the coconut flour with the egg yolks and all wet ingredients separately from the egg whites. Whipping the egg whites and folding them into the wet ingredients gives you a lighter product because it creates air within the batter. THIS IS KEY. Do not skip this step. If you cake is too dense you won’t get the crispy outside layer and liquid inner layer.

You’ll notice the chocolate mixture is grainy, don’t worry! You’re about to fix this with when you fold in the egg whites. Fold them in using a rubber spatula, gently wiping the edges of the bowl and gradually incorporating the chocolate. Be sure to do this carefully, if you loose too much air from the egg whites you’re batter won’t be light enough. Your end result should look like the image below.

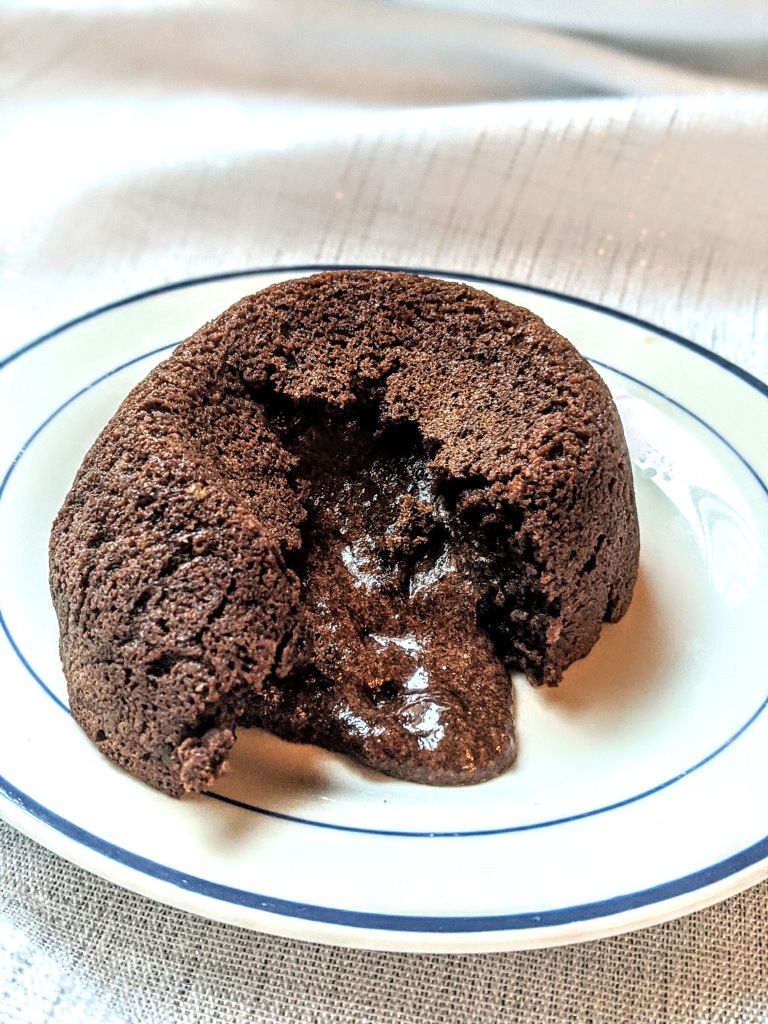
Divide the mixture between two ramekins and bake in the oven for 10 minutes and 30 seconds. I know the 30 seconds seems funny, but with these tiny cakes, every second counts! Your oven may run a little hotter or a little colder, so if you cake comes out too cooked try a little less time next time, if it comes out too raw, add some time on your next try. But in the end you get this delicious result:

Can you say wow!?

Ingredients:
Makes 2 cakes

  • 4 tbsp butter (for a dairy free cake use a margarine or coconut oil)
  • 1/2 cup dark chocolate baking chips
  • 2 egg whites
  • 3 egg yolks
  • 1/4 cup sugar of choice
  • 1 tsp vanilla extract
  • 3 tbsp coconut flour
  • pinch of salt

Instructions:

  • Preheat to oven to 450 degrees Fahrenheit.
  • Melt the butter (or dairy free alternative) and chocolate in a microwave safe bowl by microwaving for 30 seconds, then stirring. If not fully melted, microwave for an additional 10 seconds and stir, repeat until fully melted and incorporated.
  • Using a whisk, combine the melted chocolate with the three egg yolks, sugar, vanilla, and salt. Once fully mixed, add the coconut flour and whisk together.
  • Whip the egg whites on high using a hand beater or stand mixer until stiff peaks are reached. You should not need to add cream of tartar or sugar for this, be patient, they will whip I promise you!
  • Fold the egg whites into the chocolate mixture using a rubber spatula. Gently scrape the edges and drag the spatula through the center until the chocolate and egg whites have been fully combined.
  • Separate the batter eventually between two well oiled ramekins. Place into the oven and bake for 10 minutes and 30 seconds.
  • Remove from the oven and carefully place a plate so that the side you eat on is face down on top of the ramekin. Using oven mitts, carefully invert the ramekin and plate so that the plate is now right side up with the ramekin sitting on top. Gently life the ramekin off using the oven mitts so that the cake slides out and onto the plate.
  • Slice with a knife and watch that gooey molten magic happen! Enjoy!

Spinach Mint Walnut Pesto

Allergen information: gluten free, contains nuts, contains dairy

Pesto is delicious year round, but there’s something about summer that just makes pesto taste that much better. I used this in my Broccoli Summer Squash Pesto Pasta this week and it was hard to leave any leftovers, even though I cooked an entire box of pasta! While I love a traditional pesto with basil and pine nuts, my quarantine pantry has run out of pine nuts, so I’ve started experimenting with some alternatives.

I knew I was craving the taste of some fresh spinach, but I wasn’t in the mood for salad. And so this recipe was born! Spinach and mint are such fresh vibrant flavors to balance the heavier walnut, parmesan, and olive oil components of pesto. Finished with some fresh lemon juice, it brings such a brightness to any pasta dish. Don’t just stop there though, there are so many ways to use pesto, like these 10 suggested by The Kitchn!

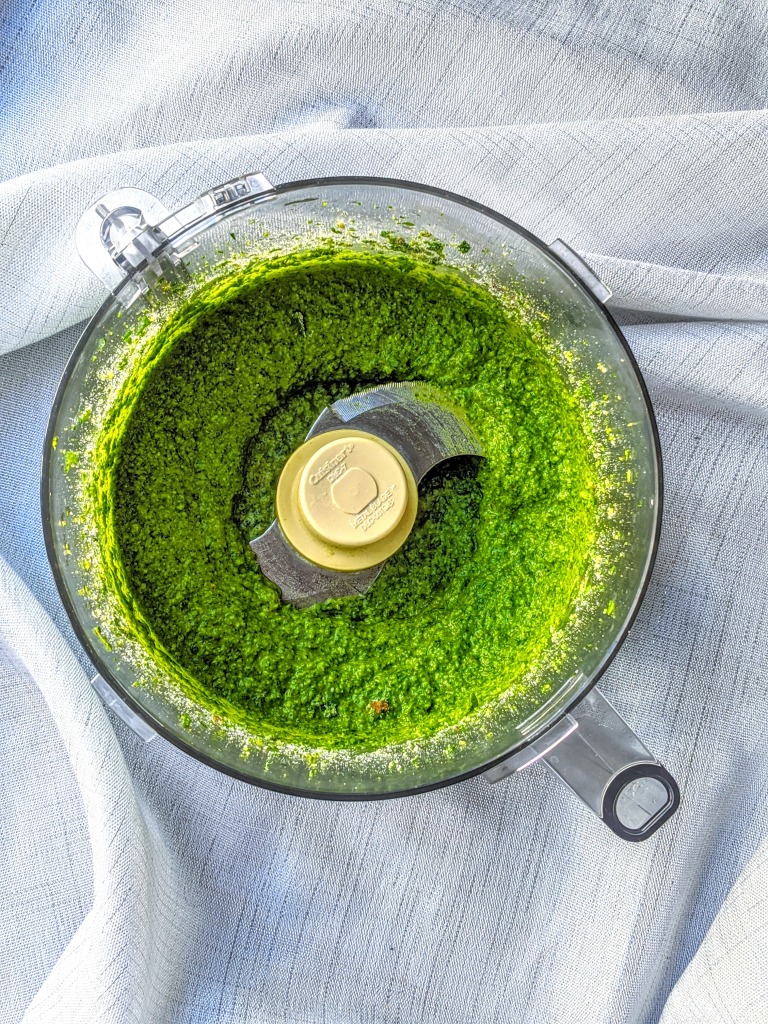
Start by adding the spinach, mint, walnuts, and garlic to your food processor. Process them until you have a finely minced mixture.

While the processor is running, add the olive oil until you reach a smooth consistency (add a little more or less than the suggested amount of the consistency doesn’t look correct to you!) Then add the parmesan cheese and pulse or blend for 10-20 more seconds. Season with lemon juice, salt and pepper and pulse to combine, taste and adjust seasoning as needed.

Add to your favorite meal and enjoy!

Ingredients

  • 4 cup fresh spinach
  • 2 cups fresh mint
  • 1 clove fresh garlic
  • 1/3 cup walnuts
  • 1/2 cup extra virgin olive oil
  • 1/2 cup fresh grated Parmesan cheese
  • 1 tsp fresh lemon juice
  • 1/2 tsp salt (note that this will be salty on it’s own, but when added to unsalted pasta or vegetables will taste right, cut in half if added to other salted food)
  • 1/2 tsp pepper

Instructions

  • Add the spinach, mint, garlic, and walnuts to a food processor.
  • Blend to combine until the leaves and nuts are finely ground.
  • While the food processor is running, add the olive oil until the desired consistency is desired (should be velvety smooth). Then add Parmesan cheese, lemon juice, salt and pepper, continuing to blend for 10-20 more seconds.
  • Taste and adjust seasoning as necessary, add to your favorite pasta or use for any other meal!

Broccoli Summer Squash Pesto Pasta

Allergen information: contains gluten, nuts, dairy.

As food begins to come into season here in New England, adding fresh vegetables to pasta is one of my favorite summer meals. Paired with my Spinach Mint Walnut Pesto, this pasta is fresh but definitely filling.

It’s super simple, only requiring two pots (not counting the food processor to make the pesto in) and can be made in around 20 minutes. What’s not to love about a quick, delicious, and nutritious summer dinner?

Cook one box of penne pasta according to box instructions or via your preferred cooking method so that the pasta is just soft, but still has a bit of stiffness to it. Strain the pasta and rinse briefly with cold water, just enough to stop the cooking process and keep your pasta al dente.

While the pasta is cooking, chop the broccoli and summer squash. Add a 1/4 cup of water to a high walled stainless steal fry pan (such as a 4 qt saute pan). Add the chopped broccoli and cover. Steam the broccoli until it is just tender to the a fork, do not cook until the stem is very soft, your broccoli will be mushy by the end of cooking if you do this. Remove the cap and add the summer squash. Stir the vegetables gently while the water cooks off, making sure all the summer squash is cooked in the process.

Once the water has evaporated off and the vegetables are cooked, remove from heat. Add the strained pasta to the pan and all the pesto from one recipe of the Spinach Mint Walnut Pesto. Stir to evenly coat the pasta and vegetables with pesto. Portion into serving bowls and enjoy!

Ingredients

Instructions

  • Prepare the pesto and set aside.
  • Cook the penne pasta according to box instructions or via preferred cooking method. Cook pasta until it is soft, but retains some of it’s firmness (known as al dente). Strain the pasta and rinse briefly with cold water, just enough to stop the cooking process. Do not rinse for more than 5-10 seconds as you will remove the starchy quality on the outside of the pasta which helps the pesto stick to it.
  • While the pasta is cooking, chop the broccoli into small florets. Chop the summer squash into rounds roughly 5 mm in thickness. For the larger rounds, cut in half to make for a more comfortable bites.
  • In a high walled frying pan, add 1/4 cup of water and the broccoli florets, put over high heat. Steam the broccoli for roughly 4-5 minutes, checking frequently to ensure the broccoli does not over steam. Once steams are just tender to a fork, add the summer squash and keep the cover removed. Stir the vegetables gently while the water cooks off and the summer squash cooks. Once the water cooks off and the vegetables are cooked, remove the pot from heat.
  • Add the strained pasta and the pesto. Stir to coat the pasta and vegetables evenly with the pesto. Portion into serving bowls and enjoy!

Spicy Bloody Mary

Growing up, I often watched family members enjoy a good Bloody Mary on holiday mornings or out at brunch. I couldn’t fathom the idea of drinking tomato juice and having it be something I enjoyed. However, as I entered adulthood, the idea of a light and refreshing drink to start the morning had more and more appeal. A few years ago I finally asked my mom to prepare me one and I was hooked.

I’m a sucker for anything spicy or that has a briny quality to it, so it turns out the Bloody Mary is actually a dream cocktail for me. It’s also a cocktail that’s naturally red in color thanks to the tomatoes so it makes for a great drink on this Memorial Day!

There is one secret ingredient in this Bloody Mary that makes it extra spicy without overwhelming the other flavors. Wasabi! I don’t often keep horseradish in my fridge, as it’s not an ingredient that I use very often. What I do like to do a lot is order sushi, which often comes with more wasabi than necessary. In the US, most wasabi is not the actual wasabi paste, but rather a combination of horseradish, mustard, and green food coloring. True wasabi is rather rare and even in Japan the demand can be so high that you often still get the horseradish mixture! I keep one little leftover container in my fridge for occasions such as this, and I find it dissolves very well into the cocktail giving a very even spicy flavor throughout.

The rest of this cocktail is fairly classic recipe. Sometimes it’s best not to mess with a classic, they are called that for a reason after all.

This recipe yields enough for two high ball glasses. I fill the cocktail shaker with about half a cup of cubed ice, I measure all the ingredients out and dissolve the wasabi into the tomato juice, then add all the ingredients to the shaker and shake vigorously for 10-20 seconds.

Fill each rocks glass about halfway with ice and then strain the cocktail into each glass. Garnish with some celery (I didn’t have any so I used parsley) and any toppers you like! Pair with your favorite brunch or just enjoy on it’s own, depending how many toppers you use, the drink could be your whole brunch!

Ingredients:

  • Cocktail
    • 1 1/2 cup of Clamato tomato juice cocktail (or tomato juice of choice)
    • 3 half jiggers of Worcestershire Sauce
    • 1 jigger hot sauce of choice (traditionally tobasco)
    • 1/2 tsp wasabi
    • 2 1/2 jiggers Vodka of choice
    • 1/4 tsp salt
    • 1/2 tsp pepper
  • Garnish
    • Lemon wedge
    • 1 Olive
    • 1 small dill pickle
    • 2 stems of parsley

Instructions

  • Measure the tomato juice and dissolve the wasabi into the tomato juice.
  • Add 1/2 cup of cubed ice to the cocktail shaker. Then add all of the cocktail ingredients and shake vigorously for 10-20 seconds.
  • Take two highball glasses and fill them half way with cubed ice. Strain the mixed cocktail into the glasses.
  • Garnish with your chosen toppings, sip and enjoy!

Grilled Peppers and Sauteed Two Bean Salad

I love leafy green salads, but I also love salads that bring a little more “substance” to the table. This salad is a bit of a spin on a traditional black bean salad, because I prefer the taste of a black bean that’s been lightly sauteed with some spices. It doesn’t look as clean, but I’d rather eat something super tasty rather than have something perfectly pretty (plus I think the gorgeous colors in this salad more than make up for it!).

A lot of bean salad will recommend using all raw veggies, but I think the secret to really making the flavor pop is to get a little bit of a grill or char on the skin of the peppers before you cut them up. Grilling peppers skin down keeps a good bite in the texture of the pepper, but brings their flavor to a new level. If you have access to a real grill I highly recommend using that; unfortunately the grills in my apartment community have been closed due to the ongoing COVID-19 pandemic, so I subbed in my cast iron grill pan.

To start you clean the peppers and cut them into quarters, then place them skin side down on a hot grill or grill pan. Check the bottom after a few minutes, you’ll notice that the area around the grill marks is a different shade than the still uncooked skin. Continue to grill until that shade is covering the skin of the pepper, signaling the skin is now soft and cooked and will have that enhanced flavor. Take off the grill once you have achieved this to avoid ending up with overly soft peppers. To hold up with the other elements of this salad you want the peppers to still have some toothsome quality to them.

While your peppers are grilling, rinse your beans (I used black and red kidney beans but you can use all black beans if you prefer). To a heavy bottom pan bring to medium heat and add the oil followed by the black beans and the spices. Give them a quick saute to cook the spices, but do not overcook because you don’t want the beans to break down and lose their shape all together. Chop up the rest of your ingredients, when the peppers were done, dice those and add them to a bowl holding the rest of your ingredients!

Dress the salad with a splash of vinegar and some fresh lime juice, then stir to combine! You can leave as is and serve as a side or use it to top a bed of greens. This will make a great upgraded side at any memorial day picnic you have planned!

Ingredients

  • 1 can black beans, drained
  • 1 can red kidney beans, drained
  • 1/2 red bell pepper
  • 1/2 green bell pepper
  • 1/2 orange bell pepper
  • 1/2 large yellow onion
  • 1 jalapeno pepper
  • 1 red fresno chili pepper (exclude either this or the jalapeno pepper if you prefer a mild spice level)
  • 1 cup diced tomatoes (I used quartered grape tomatoes but any will work!)
  • 1 cup frozen sweet corn
  • 1/2 bunch cilantro
  • 2 tbsp olive oil
  • 2 cloves garlic
  • 1 tsp chili powder
  • 1/2 tsp paprika
  • 1/2 tsp cumin
  • 1/2 tsp salt
  • 1/2 tsp pepper
  • 1 lime
  • Splash white vinegar

Instructions

  • Halve and trim the bell peppers. With the half you are using in this recipe, halve it again so you have two quarters of a whole bell pepper.
  • Dice the onion, tomatoes, and cilantro and set aside in a mixing bowl. Add the frozen corn to the bowl to allow it to thaw.
  • Heat your grill or grill pan to a medium heat. Add the peppers (including the whole jalapeno and red fresno chili pepper) skin sides down. Grill until all the skin is cooked and there are visible grill marks, be sure to remove from the grill before the peppers lose their shape and cook fully, you want them to still have a bite to them. Set aside on a cutting board to cool.
  • Heat a heavy bottom pan over medium heat. Then add the oil, followed by the garlic, beans, chili powder, paprika, cumin, salt, and pepper. Stir and cook until spices are well incorporated and no longer raw. Remove the beans from the pan before they break down and lose their individual shapes.
  • Dice the cooled bell peppers and finely dice the jalapeno and red fresno pepper. Add all components to the mixing bowl. Dress with a splash of white vinegar and the juice of 1/2 fresh lime. Mix all ingredients to combine.
  • Serve as a side or over a bed of greens as a stand alone salad!
Design a site like this with WordPress.com
Get started